Fog-of-War---Research-Project
I am Oscar Pérez, student of the Bachelor’s Degree in Video Games by UPC at CITM. This content is generated for the second year’s subject Project 2, under supervision of lecturer Marc Garrigó. You can check the project website here:
Project maintained by oscarpm5 Hosted on GitHub Pages — Theme by mattgraham
I am Oscar Pérez, student of the Bachelor’s Degree in Video Games by UPC at CITM. This content is generated for the second year’s subject Project 2, under supervision of lecturer Marc Garrigó.
You can check the project repository HERE to get acces to the source files and the project website HERE for a detailed article about Fog of War in Videogames.
Introduction
In this document we will take a look at what is Fog of War, different aproaches used in videogames, different types of fog of war that exist and we will finally explain how to implement it in our own videogame using some exercises to better comprehend the process.
Terminology - What is Fog of War?
Fog of war, FoW from now on, is a term used in armed conflicts that was first described in the book “The Fog of War” by Carl von Clausewitz. The expression was later used by generals during the 1st and the 2nd World War and refers to the uncertainty in situational awareness (that is the perception of environmental elements and events, the comprehension of their meaning, and the projection of their future status) experienced by participants in military operations.
In videogames this expression is used to describe unexplored or hidden terrain or map areas. It is mostly used in strategy and roleplay videogames: the former uses it to hide information about what other players are doing and thus making the game more interesting by forcing the player to take risks, gather intel or predict what others might do. The latter uses FoW to tell the players that, although they might have discovered a certain area of the playable map, they still have much more to discover and thus encourage exploration.

This image shows the videogame “Empire” by Walter Bright, released in 1977, being the first videogame that used FoW.
Types
With only two basic parameters we can define almost every videogame’s FoW:
Fog / Fog & Shroud
This first parameter depends on the kind of videogame we are willing to make and its intended features. Basically, games with FoW can be divided into two: the ones with only fog and the ones with fog and shroud. The ones with only fog are the ones that do not care so much about exploring, they instead focus on hidding information. As a player you see all the terrain at half opacity (unless you have units there, then you see the terrain as it should be) but you cannot see the enemies or buidings, or at least not in real time but a representation of their state the last tile you saw that area.
An example of a game that consist ony of visible areas and foggy areas is League of Legends. It comes up with two interesting additions to the system: bushes that are always fogged from the outside and wards that clear vision for you.
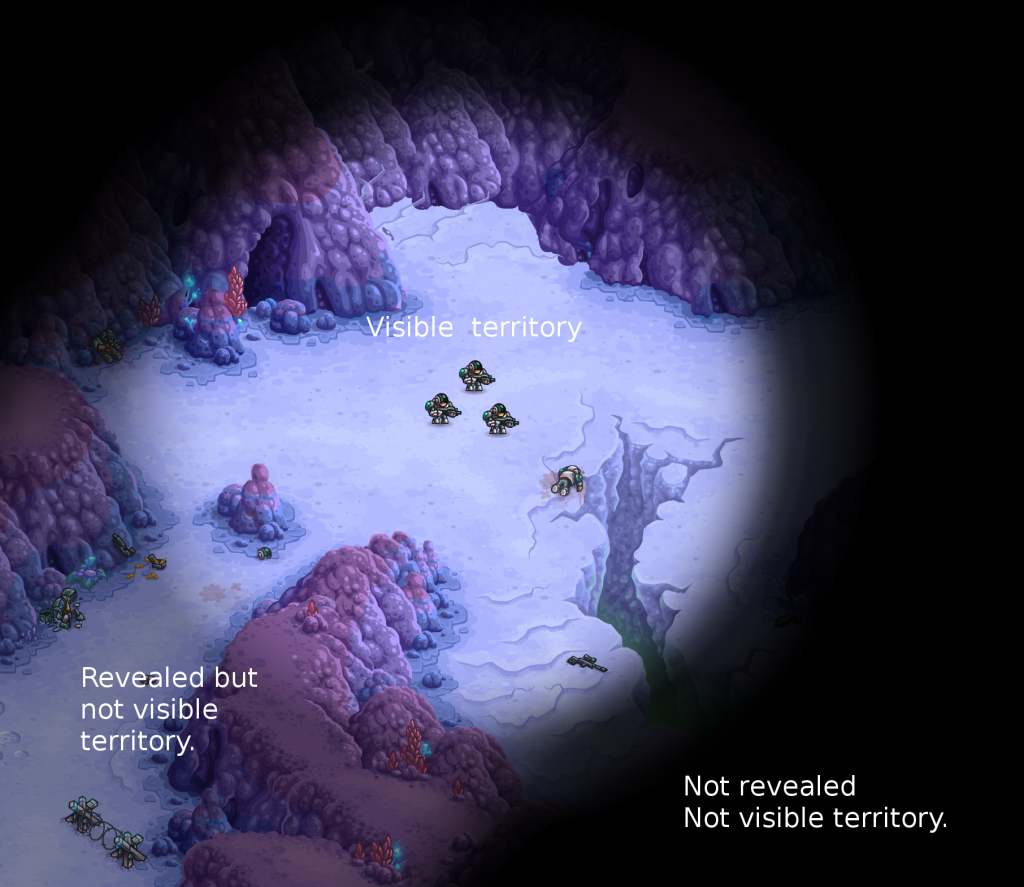
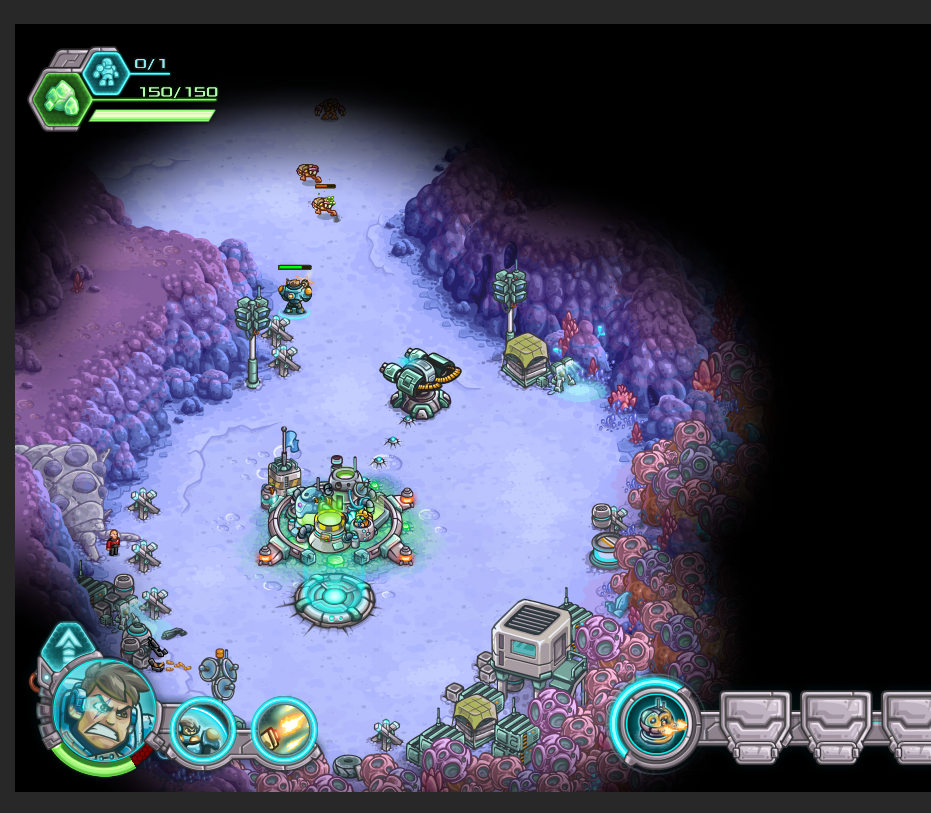
The ones with fog and shroud have two types of fog instead of one, where the fog consist of areas that have been discovered but are not visible at the moment and thus the things seen in those areas are the ones players saw last time they were in there and the shroud consists of unexplored territory, usually represented with a black texture representing a void. Iron Marines is a great example of a game with this type of FoW:
This first image shows a conecpt art of what the FoW in the game would be and in the second image we see the FoW already implemented.
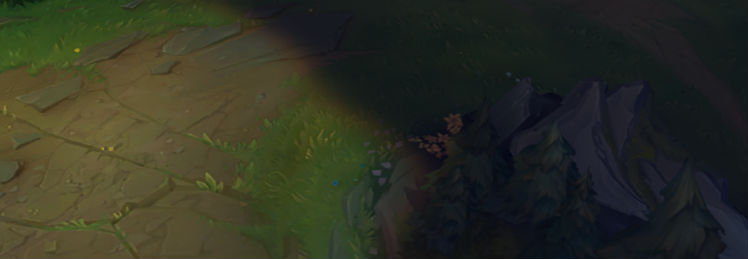
There is also a 3rd type, not that common nowadays but it certainly was in the past: a mix between fog and fog & shroud. That is only shroud; where the player has full vision of the explored territories and knows nothing about unexplored areas, with a hard transition between full visible and pitch black. Dune 2 is a great example of it:
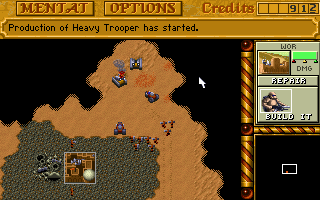
We find the same type of fog in Warcraft: Orcs and Humans
Chunky / Smooth
The second parameter will let us define how our FoW looks and feels.
While chunky fog is the easiest to implement it is also the less common to go with these days. That is due to the hard edges in the shape of squares that it forms that are not pleasing to see at all for the players. This happens because this kind of fog is conformed by an array or grid of usually two or three states (defined by an enumerator or a bool in case it is only two states) that describe if that position in the grid has been explored and if it is visible or not. When it is not visible a black square is drawn over the map or the map isn’t drawn at all. The fog layer is usually printed to the screen at half opacity.
Here is an image of some testing done in Iron Marines so you can compare it with the look and feel that the two previous shown images of the same game have:
And here is an example of what a chunky FoW system looks like in a modern game with 3D terrain:
Smooth FoW is a little bit harder to implement than the chunky one but it provides far better visuar results in 2D games nevertheless. There are many ways to get a cool looking smooth FoW ranging from methods like Bitmap Masking, blurring a FoW texture or using algorithms like the neighbour aware tile selection method and the marching squares to print only the fogged area into a texture. Some of those approaches will be covered more in depth below.
Here is an example of a game that uses smooth FoW and also fog & shroud: Age of Empires.

Different Approaches
Now that we understand what types of FoW exist, lats take a look at how different videogames implement them:
Texture mask based
With this approach we use an image file to mask a surface.
![]()
We first need a surface to cover the entire map covering each pixel 1:1 and draw it in front of our map to hide it.
Then we need an image like this one, with the shape we want to substract taht follows the player at all times:

When the player moves, we iterate each pixel of the shape image and copy its alpha value to the surface.
if we want fog & shroud instead of only shroud we can keep the information of where we did mask for the last time and clamp the alpha to a certain value if it is below that treshold. If we do that right before masking out the shape around the player we end up with a two state fog: fog & shroud.
If you want more information about this aproach you can check THIS link.
Tile Grid Based with blur
When Riot wanted to update League of Legends’ summoner’s rift they faced an unexpected problem: the old fog of war method that they where using was outdated and didn’t work properly with the new map. They had to remake the whole system.
They started by creating a 128x128 grid covering the map consisting on a flag that told the system if the fog in that spot was on/off. They tried to perform gaussian blur over the grid before rendering it but it didn’t hide the jagged edges. They then tried to upscale the data from 128x128 to 512x512 where every pixel bacame a 4x4 block with some antialising to get rid of the jagged edges. Making thus a total of 16 unique possible patterns that conformed the new data map.
They finally got rid of the jagged edges with this clever technique and could perform the gaussian blur safely. With only a 128x128 map of binary states they got a super smooth fog of war that is still being used today.
Here we can see the difference between the old jagged method and the new blurred one:

You can check an article explaining this implementation in depth HERE.
Raycasting (2D)
Raycasting is a completely different aproach than the ones we have seen so far and the look and feel of a game with raycasting is completely different from one with tilebased FoW or mask FoW as it is a more realistic aproach. This technique consists of throwing rays in all directions around the player to see where they intersect with objects and draw walls there.
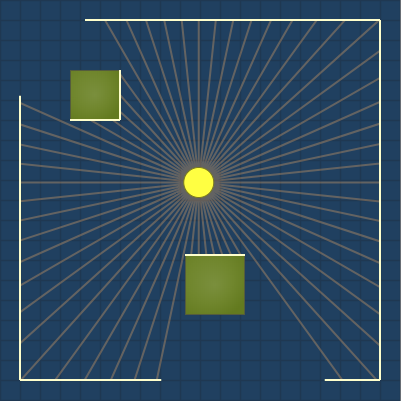
But what if we cast rays only at angles where we know walls begin or end? The triangles produced by these rays are the visible areas and we do not have to cast that many rays.
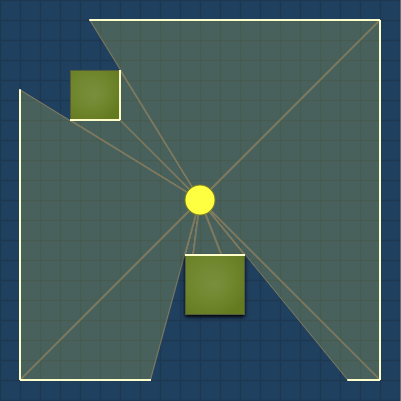
THIS article talks about 2D visibility more in-depth and explains a more efficient approach to the problem combining ray casting and wall intersection into a single algorithm.
Selected Approach
Our approach will consist of bitmasking sub-pixels. Altough by the name it may seem hard to comprehend I assure you it is easier to understand than you think. This is the result that we will end up with once we finish:
To make the system work we first need a FoW map, an array representing every tile in our 2D map. We will use the fog & shroud type of fog explained above, so we will need two “layers” for the map, one for the shroud and another for the fog. The array we will use consists of a struct with two numbers, one for each layer. This is how it looks in code:
struct FoWDataStruct
{
	unsigned short tileFogBits;
	unsigned short tileShroudBits;
};
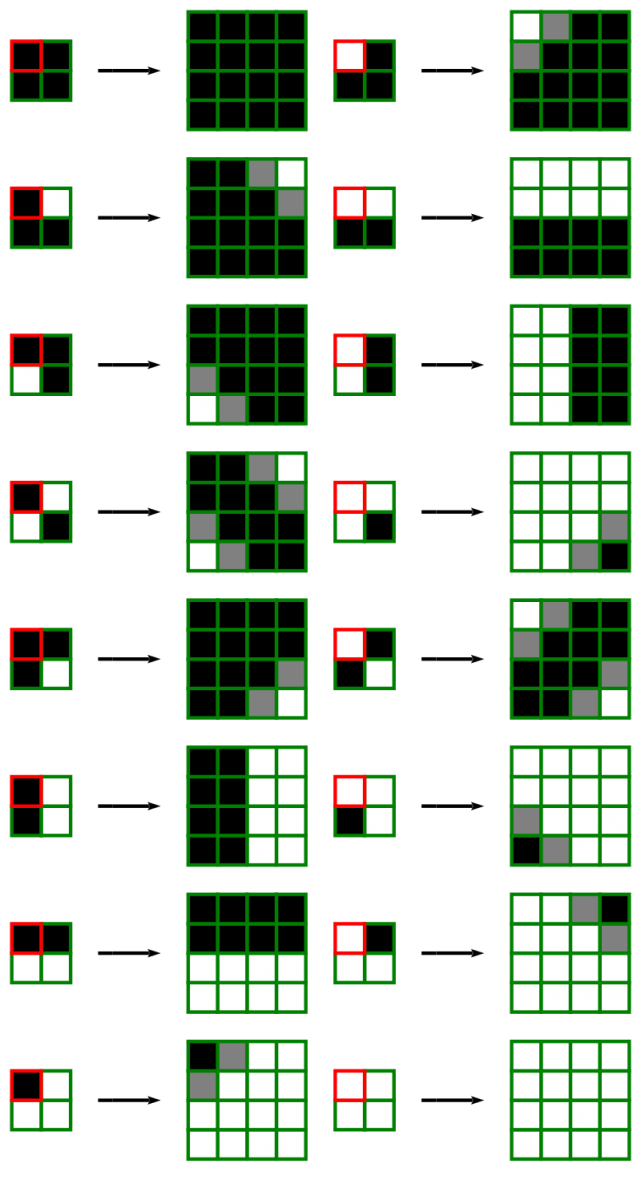
Each variable on the struct will hold a number that refers to a certain combination of subpixels that can be translated into smooth FoW textures! So we will divide each map tile into a grid of 3x3 sub-pixels, this is 9 sub-pixels in total. You have to imagine it being like this:
![]()
So this grid will describe the amount of fog we have in each tile, with each sub-pixel being represented by a single bit. Note that you can choose the amount of bits you want, more bits means more possibilities but take into account that the higher the number of sub-pixels the bigger the table that translates bits into textures needs to be. For a 3x3 sub-pixel grid we will need 9 bits, that is the equivalent of a table with 512 entries.
![]()
You don’t need to define all 512 entries though, just the ones you care about. For example, maybe you don’t care if a grid has only bit 4 set so you have no need to display it and thus don’t define it.
If we have a grid of sub-pixels and we want to define the North-West corner for example it would look like this:

This translates into this number in binary:
![]()
Which translates into 0x5F in hex value that represents the number 95 in decimal. So we set the entry 95 in the translation table to be the id of a certain texture that represents the North-West corner fogged tile. I use a map to set the definitions I care about, with the bit value being the key and the texture ID being the value. My table looks like this:
//Straight-forward cases
	bitToTextureTable.insert(std::pair<unsigned short, int>(fow_ALL, 0));
	bitToTextureTable.insert(std::pair<unsigned short, int>(fow_NNN, 1));
	bitToTextureTable.insert(std::pair<unsigned short, int>(fow_WWW, 2));
	bitToTextureTable.insert(std::pair<unsigned short, int>(fow_EEE, 3));
	bitToTextureTable.insert(std::pair<unsigned short, int>(fow_SSS, 4));
	bitToTextureTable.insert(std::pair<unsigned short, int>(fow_CNW, 5));
	bitToTextureTable.insert(std::pair<unsigned short, int>(fow_CSE, 6));
	bitToTextureTable.insert(std::pair<unsigned short, int>(fow_CNE, 7));
	bitToTextureTable.insert(std::pair<unsigned short, int>(fow_CSW, 8));
	bitToTextureTable.insert(std::pair<unsigned short, int>(fow_JNE, 9));
	bitToTextureTable.insert(std::pair<unsigned short, int>(fow_JSW, 10));
	bitToTextureTable.insert(std::pair<unsigned short, int>(fow_JNW, 11));
	bitToTextureTable.insert(std::pair<unsigned short, int>(fow_JSE, 12));

	//more complicated cases (combinations)
	//diagonals
	bitToTextureTable.insert(std::pair<unsigned short, int>(20, 9));
	bitToTextureTable.insert(std::pair<unsigned short, int>(80, 10));
	bitToTextureTable.insert(std::pair<unsigned short, int>(17, 11));
	bitToTextureTable.insert(std::pair<unsigned short, int>(272, 12));
	bitToTextureTable.insert(std::pair<unsigned short, int>(273, 13));
	bitToTextureTable.insert(std::pair<unsigned short, int>(84, 14));
	//lines
	bitToTextureTable.insert(std::pair<unsigned short, int>(23, 1));
	bitToTextureTable.insert(std::pair<unsigned short, int>(308, 3));
	bitToTextureTable.insert(std::pair<unsigned short, int>(89, 2));
	bitToTextureTable.insert(std::pair<unsigned short, int>(464, 4));
	//joints
	bitToTextureTable.insert(std::pair<unsigned short, int>(6, 9));
	bitToTextureTable.insert(std::pair<unsigned short, int>(36, 9));
	bitToTextureTable.insert(std::pair<unsigned short, int>(72, 10));
	bitToTextureTable.insert(std::pair<unsigned short, int>(192, 10));
	bitToTextureTable.insert(std::pair<unsigned short, int>(3, 11));
	bitToTextureTable.insert(std::pair<unsigned short, int>(9, 11));
	bitToTextureTable.insert(std::pair<unsigned short, int>(384, 12));
	bitToTextureTable.insert(std::pair<unsigned short, int>(288, 12));
	//corners
	bitToTextureTable.insert(std::pair<unsigned short, int>(4, 9));
	bitToTextureTable.insert(std::pair<unsigned short, int>(64, 10));
	bitToTextureTable.insert(std::pair<unsigned short, int>(1, 11));
	bitToTextureTable.insert(std::pair<unsigned short, int>(256, 12));
Where the straightforward cases’ bit values have already been define in here:
#define FOW_BIT_NW  (1 << 0)//this is equal to 1* 2^0
#define FOW_BIT_N   (1 << 1)//this is equal to 1* 2^1
#define FOW_BIT_NE  (1 << 2)//this is equal to 1* 2^2
#define FOW_BIT_W   (1 << 3)//this is equal to 1* 2^3
#define FOW_BIT_C   (1 << 4)//this is equal to 1* 2^4
#define FOW_BIT_E   (1 << 5)//this is equal to 1* 2^5
#define FOW_BIT_SW  (1 << 6)//this is equal to 1* 2^6
#define FOW_BIT_S   (1 << 7)//this is equal to 1* 2^7
#define FOW_BIT_SE  (1 << 8)//this is equal to 1* 2^8

#define fow_NON         0
#define fow_ALL         (FOW_BIT_NW | FOW_BIT_N | FOW_BIT_NE |FOW_BIT_W | FOW_BIT_C | FOW_BIT_E |FOW_BIT_SW | FOW_BIT_S | FOW_BIT_SE)

//Straight lines
#define fow_EEE         (FOW_BIT_SE | FOW_BIT_E | FOW_BIT_NE)
#define fow_NNN         (FOW_BIT_NE | FOW_BIT_N | FOW_BIT_NW)
#define fow_WWW         (FOW_BIT_NW | FOW_BIT_W | FOW_BIT_SW)
#define fow_SSS         (FOW_BIT_SW | FOW_BIT_S | FOW_BIT_SE)

//Corners
#define fow_CNE         (FOW_BIT_E | FOW_BIT_NE | FOW_BIT_N |FOW_BIT_NW | FOW_BIT_C | FOW_BIT_SE)
#define fow_CNW         (FOW_BIT_N | FOW_BIT_NW | FOW_BIT_W |FOW_BIT_SW | FOW_BIT_C | FOW_BIT_NE)
#define fow_CSW         (FOW_BIT_W | FOW_BIT_SW | FOW_BIT_S |FOW_BIT_NW | FOW_BIT_C | FOW_BIT_SE)
#define fow_CSE         (FOW_BIT_S | FOW_BIT_SE | FOW_BIT_E |FOW_BIT_NE | FOW_BIT_C | FOW_BIT_SW)

//Inner Corners (joints)
#define fow_JNE         (FOW_BIT_E | FOW_BIT_NE | FOW_BIT_N)
#define fow_JNW         (FOW_BIT_N | FOW_BIT_NW | FOW_BIT_W)
#define fow_JSW         (FOW_BIT_W | FOW_BIT_SW | FOW_BIT_S)
#define fow_JSE         (FOW_BIT_S | FOW_BIT_SE | FOW_BIT_E)
The combinations that we don’t care about just aren’t defined.
So now that we have all of our tiles defined it is time to create the shape masks that will be used to mask out shapes from the fog. This is also when we take advantadge of the defines we have just set up to make it easy for programmers to create the masks. This is an example of a circle mask of radius 3:
fow_ALL, fow_ALL, fow_CNW, fow_NNN, fow_CNE, fow_ALL, fow_ALL,
fow_ALL, fow_CNW, fow_JNW, fow_NON, fow_JNE, fow_CNE, fow_ALL,
fow_CNW, fow_JNW, fow_NON, fow_NON, fow_NON, fow_JNE, fow_CNE,
fow_WWW, fow_NON, fow_NON, fow_NON, fow_NON, fow_NON, fow_EEE,
fow_CSW, fow_JSW, fow_NON, fow_NON, fow_NON, fow_JSE, fow_CSE,
fow_ALL, fow_CSW, fow_JSW, fow_NON, fow_JSE, fow_CSE, fow_ALL,
fow_ALL, fow_ALL, fow_CSW, fow_SSS, fow_CSE, fow_ALL, fow_ALL,
We will use precomputed masks for the sake of simplicity but you can create an algorithm that creates custom masks procedurally, too.
Once we have the mask that we want we only have to apply it to our fog map to update its state. This is done by bitwise ANDing the mask array with the fog of map data that already exists. When bitwise ANDing we maintain the fog bits and only add new ones from the mask so the code can handle multiple masks applied on the same spot perfectly.
So the next function applies the shape mask to an array that have the tiles which can be potentially affected bitwise ANDing every position in the mask array with its corresponding position in the fog data array:
void ApplyMaskToTiles(std::vector<iPoint>tilesAffected)
{

	//We first take the correct precomputed mask and store it in the precMask variable
	unsigned short* precMask = &App->fowManager->circleMasks[boundingBoxRadius - fow_MIN_CIRCLE_RADIUS][0];


	for (int i = 0; i < tilesAffected.size(); i++)
	{
		//We then request the fog & shroud values of each affected tile.
		FoWDataStruct* tileValue = App->fowManager->GetFoWTileState(tilesAffected[i]);

		//And (bitwise AND) them with the mask
		if (tileValue != nullptr)
		{
			tileValue->tileShroudBits &= *precMask;
			tileValue->tileFogBits &= *precMask;
		}
		precMask++;
	}

}
With this we have a functional FoW system and we just need to print it to the screen to visualize the data. To draw the fog we simply traverse the fog map and use the bits in combination with the translation table to get the correct texture for each tile. If you want More information about this aproach I recommend you to se both of these articles: Implementing Chunky FoW & Implementing Smooth FoW. Also if you don’t know how bitwise operators work check THIS thread and THIS article.
Code Structure
To make this project I have made two modules:
- The first contains an abstraction of an entity that stores its position and the radius of vision of the entity. It also has a flag that determines if the entity can see and another that determines if the entity is visible or obscured by the fog.
class FoWEntity
{
public:
	FoWEntity(iPoint WorldPos,bool providesVisibility);
	~FoWEntity();

	bool CleanUp();
	void Update();
	void SetNewPosition(iPoint pos);
	iPoint GetPos()const;

	void SetNewVisionRadius(uint radius);
	std::vector<iPoint> GetTilesInsideRadius()const;


private:
	void ApplyMaskToTiles(std::vector<iPoint>tilesAffected);


public:
	bool deleteEntity;
	bool isVisible;
private:
	iPoint posInMap;
	bool providesVisibility;

	//Max radius from the entity at which tiles are affected (square to be checked)
	uint boundingBoxRadius;
};
- The second module contains the fog of war map with all the tile data, has functions to manage it and stores the translation table and the precomputed masks. It also defines the struct for each fog of war tile
//this struct holds the information of fog and shroud for every tile
struct FoWDataStruct
{
	unsigned short tileFogBits; //saves information about which type of fog are we in (useful for smooth edges)
	unsigned short tileShroudBits; //same as above but for shroud
};


class FoWManager :public j1Module
{
	public:
	FoWManager();
	~FoWManager();

	bool Awake(pugi::xml_node&);
	bool Start();
	bool PreUpdate();
	bool Update(float dt);
	bool PostUpdate();
	bool CleanUp();

	FoWEntity* CreateFoWEntity(iPoint pos, bool providesVisibility);

	//Resets the map to its shrouded state
	void ResetFoWMap();
	void CreateFoWMap(uint width, uint height);
	void DeleteFoWMap();
	//Updates the data on the FoWMap based on the FoWEntities position and mask shape
	void UpdateFoWMap();
	void DrawFoWMap();
	//Tell the map that it needs to be updated the next frame
	void MapNeedsUpdate();

	//Returns the visibility state of the chosen tile (given its map coordinates)
	FoWDataStruct* GetFoWTileState(iPoint mapPos)const;
	//Returns true if the tile is inside the map boundaries, otherwise returns false
	bool CheckFoWTileBoundaries(iPoint mapPos)const;
	//Returns true if the tile is visible (there's no FOG in it) otherwise returns false
	bool CheckTileVisibility(iPoint mapPos)const;

	public:
	//A number of precomputed circle masks ranging between a radius of 2 to a radius of 5
	unsigned short circleMasks[4][fow_MAX_CIRCLE_LENGTH * fow_MAX_CIRCLE_LENGTH] =
	{
		{//R2
		fow_ALL, fow_CNW, fow_NNN, fow_CNE, fow_ALL,
		fow_CNW, fow_JNW, fow_NON, fow_JNE, fow_CNE,
		fow_WWW, fow_NON, fow_NON, fow_NON, fow_EEE,
		fow_CSW, fow_JSW, fow_NON, fow_JSE, fow_CSE,
		fow_ALL, fow_CSW, fow_SSS, fow_CSE, fow_ALL,
		},
		{//R3
		fow_ALL, fow_ALL, fow_CNW, fow_NNN, fow_CNE, fow_ALL, fow_ALL,
		fow_ALL, fow_CNW, fow_JNW, fow_NON, fow_JNE, fow_CNE, fow_ALL,
		fow_CNW, fow_JNW, fow_NON, fow_NON, fow_NON, fow_JNE, fow_CNE,
		fow_WWW, fow_NON, fow_NON, fow_NON, fow_NON, fow_NON, fow_EEE,
		fow_CSW, fow_JSW, fow_NON, fow_NON, fow_NON, fow_JSE, fow_CSE,
		fow_ALL, fow_CSW, fow_JSW, fow_NON, fow_JSE, fow_CSE, fow_ALL,
		fow_ALL, fow_ALL, fow_CSW, fow_SSS, fow_CSE, fow_ALL, fow_ALL,
		},
		{//R4
		fow_ALL, fow_ALL, fow_CNW, fow_NNN, fow_NNN, fow_NNN, fow_CNE, fow_ALL, fow_ALL,
		fow_ALL, fow_CNW, fow_JNW, fow_NON, fow_NON, fow_NON, fow_JNE, fow_CNE, fow_ALL,
		fow_CNW, fow_JNW, fow_NON, fow_NON, fow_NON, fow_NON, fow_NON, fow_JNE, fow_CNE,
		fow_WWW, fow_NON, fow_NON, fow_NON, fow_NON, fow_NON, fow_NON, fow_NON, fow_EEE,
		fow_WWW, fow_NON, fow_NON, fow_NON, fow_NON, fow_NON, fow_NON, fow_NON, fow_EEE,
		fow_WWW, fow_NON, fow_NON, fow_NON, fow_NON, fow_NON, fow_NON, fow_NON, fow_EEE,
		fow_CSW, fow_JSW, fow_NON, fow_NON, fow_NON, fow_NON, fow_NON, fow_JSE, fow_CSE,
		fow_ALL, fow_CSW, fow_JSW, fow_NON, fow_NON, fow_NON, fow_JSE, fow_CSE, fow_ALL,
		fow_ALL, fow_ALL, fow_CSW, fow_SSS, fow_SSS, fow_SSS, fow_CSE, fow_ALL, fow_ALL,
		},
		{//R5
		fow_ALL, fow_ALL, fow_ALL, fow_ALL, fow_CNW, fow_NNN, fow_CNE, fow_ALL, fow_ALL, fow_ALL, fow_ALL,
		fow_ALL, fow_ALL, fow_CNW, fow_NNN, fow_JNW, fow_NON, fow_JNE, fow_NNN, fow_CNE, fow_ALL, fow_ALL,
		fow_ALL, fow_CNW, fow_JNW, fow_NON, fow_NON, fow_NON, fow_NON, fow_NON, fow_JNE, fow_CNE, fow_ALL,
		fow_ALL, fow_WWW, fow_NON, fow_NON, fow_NON, fow_NON, fow_NON, fow_NON, fow_NON, fow_EEE, fow_ALL,
		fow_CNW, fow_JNW, fow_NON, fow_NON, fow_NON, fow_NON, fow_NON, fow_NON, fow_NON, fow_JNE, fow_CNE,
		fow_WWW, fow_NON, fow_NON, fow_NON, fow_NON, fow_NON, fow_NON, fow_NON, fow_NON, fow_NON, fow_EEE,
		fow_CSW, fow_JSW, fow_NON, fow_NON, fow_NON, fow_NON, fow_NON, fow_NON, fow_NON, fow_JSE, fow_CSE,
		fow_ALL, fow_WWW, fow_NON, fow_NON, fow_NON, fow_NON, fow_NON, fow_NON, fow_NON, fow_EEE, fow_ALL,
		fow_ALL, fow_CSW, fow_JSW, fow_NON, fow_NON, fow_NON, fow_NON, fow_NON, fow_JSE, fow_CSE, fow_ALL,
		fow_ALL, fow_ALL, fow_CSW, fow_SSS, fow_JSW, fow_NON, fow_JSE, fow_SSS, fow_CSE, fow_ALL, fow_ALL,
		fow_ALL, fow_ALL, fow_ALL, fow_ALL, fow_CSW, fow_SSS, fow_CSE, fow_ALL, fow_ALL, fow_ALL, fow_ALL,
		},
	};


	private:
	//This is where the FoWEntites are stored
	std::vector<FoWEntity*> fowEntities;
	//This is where we store our FoW information
	FoWDataStruct* fowMap = nullptr;

	//Textures to use when drawing
	SDL_Texture* smoothFoWtexture = nullptr;
	SDL_Texture* debugFoWtexture = nullptr;

	//Map that we use to translate bits to Texture Id's
	std::map<unsigned short, uint> bitToTextureTable;

	uint width;
	uint height;
	bool debugMode = false;
	bool foWMapNeedsRefresh = false;
};
Each entity in the entity system that we want to provide or interact with visibility contains a pointer to a FoWEntity and we have to update the position of the FoWEntity every time we want to move the entity containing it.
I implemented a few debug tools that will help us better understand what the code is doing:
- F1: toggles fog textures between smooth fog and a deub tileset
- F2: resets fog to its starting state
- Left click: spawns a friendly unit at cursor position
If you download the project solution keep in mind these controls:
- WASD: move the player around
- Arrows: move the friendly units around
- Esc: closes the application
More Documentation & References
- Fog of War in league of legends
- Implementing FoW for RTS part 1 and part 2
- One of the bests: How to implement FoW part 1 and part 2
- Creating FoW in Games
- 2D Visibility - Raycasting
- Marching squares algorithm
- Neighbour aware Tile Selection
- What are Bitshift operators?
- Compound Bitwise operators
- Bitwise operators in C/C++
- Fog of War videogame examples
- Fog of War through textures
- Gaussian Blur
- Drawing negative Circles
TODO’s
We are now ready to complete the TODO’s! The TODO’s are small exercises guided by code comments that are intended to walk you through all the process explained above, from creating a FoW Map and its entities to applying a Mask to help you understand the process and systems involved. Once you finish all the TODO’s you will have a fully functional FoW.
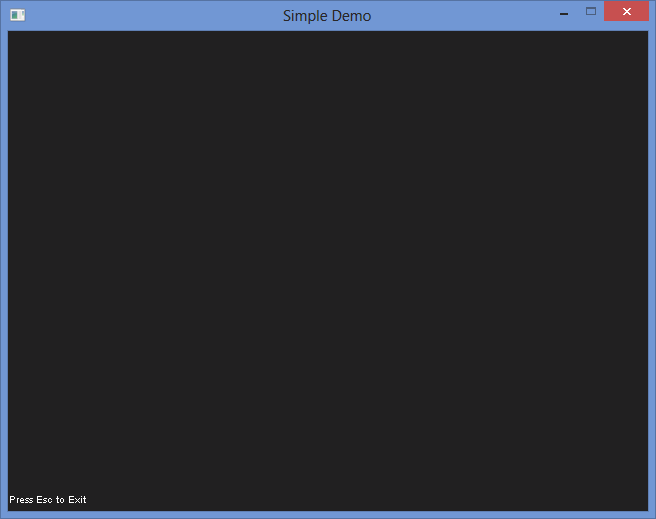
TODO 1 - Creating the FoW Map
In this TODO you will learn how to create the basic data map needed for the system to work prpoerly. This map will store all the data related with FoW:
void FoWManager::CreateFoWMap(uint w, uint h)
{
	width = w;
	height = h;

	//TODO 1: Complete this function to create a FoWMap. EASY!
	//If a map has already been created you will need to delete it first, hint: there's a function for that :)
	//Note that the map will be a 1 dimensional array and you might need the 2 variables above to set it up. The map should be stored in the variable "fowMap"
	//Don't forget to reset it once is creeated, hint: there's another function for that :)

	//Code here

	MapNeedsUpdate();
}
Solution:
void FoWManager::CreateFoWMap(uint w, uint h)
{
	width = w;
	height = h;

	//TODO 1: Complete this function to create a FoWMap. EASY!
	//If a map has already been created you will need to delete it first, hint: there's a function for that :)
	//Note that the map will be a 1 dimensional array and you might need the 2 variables above to set it up. The map should be stored in the variable "fowMap"
	//Don't forget to reset it once is creeated, hint: there's another function for that :)
	DeleteFoWMap();
	fowMap = new FoWDataStruct[width * height];
	ResetFoWMap();

	MapNeedsUpdate();
}
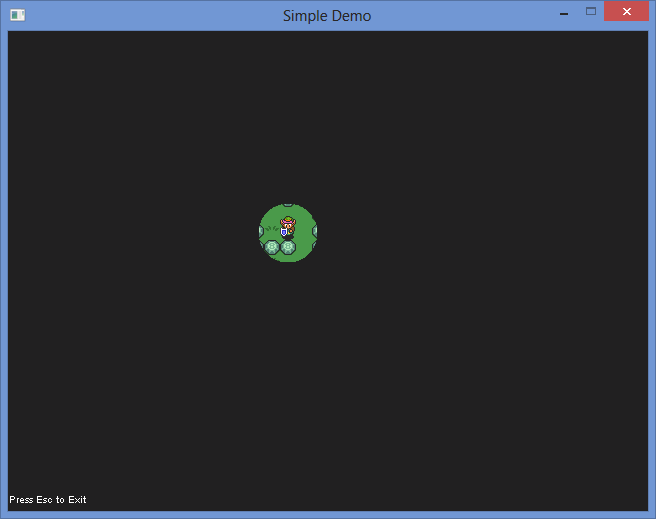
This is how the project should look like when you finish this TODO (The grid of 0’s that you see is a debug tool that you can access by pressing F1 and shouws the current FoW map with debug textures):
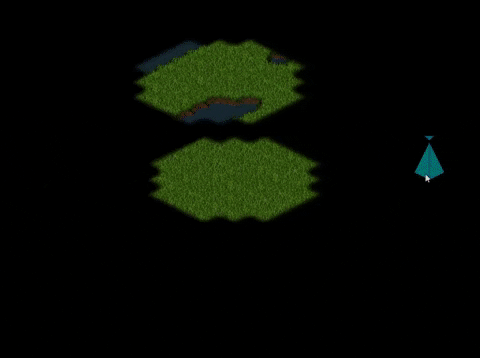
TODO 2 - Creating FoW Entites
In this series of TODO’s you will learn how the map interacts with the entities in the world. This first TODO shows how FoW Entites (abstractions of normal entities for the FoW manager to work with) work:
//TODO 2: Complete this function: given a position and a flag, create a new entity and return a pointer to it (or nullptr if something has gone wrong)
//Note that the FoWManager needs to know about the entity we are creating, try to find where the FoWManager module stores all the FoWEntities and add it there
FoWEntity* FoWManager::CreateFoWEntity(iPoint pos, bool providesVisibility)
{
	//Code Here
	return nullptr;
}
Solution:
//TODO 2: Complete this function: given a position and a flag, create a new entity and return a pointer to it (or nullptr if something has gone wrong)
//Note that the FoWManager needs to know about the entity we are creating, try to find where the FoWManager module stores all the FoWEntities and add it there
FoWEntity* FoWManager::CreateFoWEntity(iPoint pos, bool providesVisibility)
{
	FoWEntity* entity = nullptr;

	entity = new FoWEntity(pos,providesVisibility);

	if (entity != nullptr)
	{
		fowEntities.push_back(entity);
	}

	return entity;
}
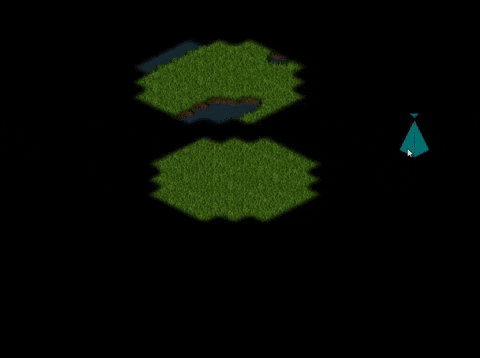
TODO’s 2.1-2.3 show how to link FoW Entites to normal entities:
TODO 2.1 - TODO 2.2
//TODO 2.1: The player will need to have a FoWEntity assigned to him (the variable that you need is called "visionEntity")
	//Note that the player provides visibility to allies!
	//Extra: you can also set its vision radius once created calling the function SetNewVisionRadius(), you can choose between a radius of 2,3,4 and 5

//Code here
Solution:
//TODO 2.1 / TODO 2.2: The player will need to have a FoWEntity assigned to him (the variable that you need is called "visionEntity")
	//Note that the player provides visibility to allies!
	//Extra: you can also set its vision radius once created calling the function SetNewVisionRadius(), you can choose between a radius of 2,3,4 and 5
	visionEntity = App->fowManager->CreateFoWEntity(pos, true);
	visionEntity->SetNewVisionRadius(4);
TODO 2.3
//TODO 2.3: Same as before! BUT, this unit is an enemy, it does not provide visibility! As a consequence, it doesn't matter if you change its radius of vision as it sees nothing :)

//Code here
Solution:
//TODO 2.3: Same as before! BUT, this unit is an enemy, it does not provide visibility! As a consequence, it doesn't matter if you change its radius of vision as it sees nothing :)
	visionEntity = App->fowManager->CreateFoWEntity(pos, false);
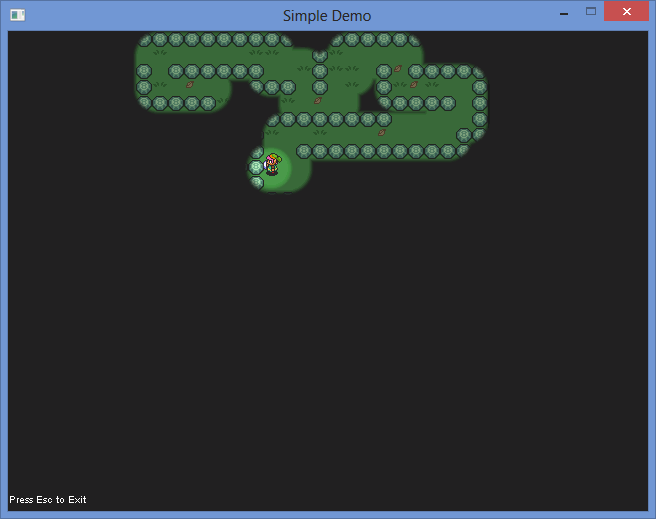
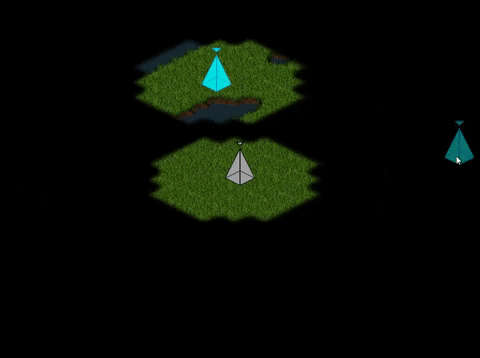
Once you finish this series of TODO’s, the project should look like this:

The entites should not be visible unless you enter debug mode with F1
TODO 3 - Applying the BitMask
The real deal! This function is the most important one in the code, and you need to understand it very well. This is the function that changes the data in the FoW map based on a bit Mask. Half of the function has already been done and the other half is there for you to complete. There is also a TODO 3.1 but you have to do nothing there, it has been created only to point you to some useful information to complement your understanding of the function in this TODO, it is recommended that you read it if you want a deeper understanding of the system.
//TODO 3: Comprehend and complete this function: (this is the function that does the magic for us)
void FoWEntity::ApplyMaskToTiles(std::vector<iPoint>tilesAffected)
{

	//We first take the correct precomputed mask and store it in the precMask variable (it is recommended to see what they are made of. You can find the masks at the FoWManager.h module)
	//Note that it is an array
	unsigned short* precMask = &App->fowManager->circleMasks[boundingBoxRadius - fow_MIN_CIRCLE_RADIUS][0];

	//You have to complete the code inside this for
	for (int i = 0; i < tilesAffected.size(); i++)
	{
		//You have to request the fog & shroud values of each affected tile. Hint:(You can take both with a single function 			call)

		//Code Here

		//And (bitwise AND) them with the mask if the tile FoW values are not nullptr
		//To bitwise AND values you just simply do this: value1 &= value2
		//the operation result will be stored in the variable on the left side.
		//In this case you want to modify the fog and shroud values that you have requested above


		//Code Here


		precMask++;
	}

}
Solution:
//TODO 3: Comprehend and complete this function: (this is the function that does the magic for us)
void FoWEntity::ApplyMaskToTiles(std::vector<iPoint>tilesAffected)
{

	//We first take the correct precomputed mask and store it in the precMask variable (it is recommended to see what they are made 	of. You can find the masks at the FoWManager.h module)
	//Note that it is an array
	unsigned short* precMask = &App->fowManager->circleMasks[boundingBoxRadius - fow_MIN_CIRCLE_RADIUS][0];

	//You have to complete the code inside this for
	for (int i = 0; i < tilesAffected.size(); i++)
	{
		//You have to request the fog & shroud values of each affected tile. Hint:(You can take both with a single function 			call)
		FoWDataStruct* tileValue = App->fowManager->GetFoWTileState(tilesAffected[i]);

		//And (bitwise AND) them with the mask if the tile FoW values are not nullptr
		//To bitwise AND values you just simply do this: value1 &= value2
		//the operation result will be stored in the variable on the left side.
		//In this case you want to modify the fog and shroud values that you have requested above

		if (tileValue != nullptr)
		{
			tileValue->tileShroudBits &= *precMask;
			tileValue->tileFogBits &= *precMask;
		}
		precMask++;
	}

}
When you are done with this TODO you should see this when you execute the project:
Altough the Mask has been applied note that it doesn’t move with the entites, and also the entites are not visible yet (unless you are in debug mode).
TODO 4 - Updating FoW Entites Position
This TODO is meant to make you think about when to update the FoWEntity position and the implications that it has.
In TODO 4.1 you have to do the same as TODO 4 but instead of in the player entity you have to do it in the friendly entity.
void Player::HandleInput(float dt)
{
	int speed = 200;

	//Code here

	if (App->input->GetKey(SDL_SCANCODE_W) == KEY_DOWN || App->input->GetKey(SDL_SCANCODE_W) == KEY_REPEAT)
	{
		pos.y -= floor(speed*dt);
	}
	if (App->input->GetKey(SDL_SCANCODE_S) == KEY_DOWN || App->input->GetKey(SDL_SCANCODE_S) == KEY_REPEAT)
	{
		pos.y += floor(speed*dt);
	}
	if (App->input->GetKey(SDL_SCANCODE_A) == KEY_DOWN || App->input->GetKey(SDL_SCANCODE_A) == KEY_REPEAT)
	{
		pos.x -= floor(speed*dt);
	}
	if (App->input->GetKey(SDL_SCANCODE_D) == KEY_DOWN || App->input->GetKey(SDL_SCANCODE_D) == KEY_REPEAT)
	{
		pos.x += floor(speed*dt);
	}

	//TODO 4: don't forget to set the new FoWEntity position when needed!
	//Note that player HandleInput() function is called every frame, you do not need to update the FoWEntity position each frame, 		only when position changes

	//Code here

}
Solution:
void Player::HandleInput(float dt)
{
	int speed = 200;

	iPoint auxPos = pos;

	if (App->input->GetKey(SDL_SCANCODE_W) == KEY_DOWN || App->input->GetKey(SDL_SCANCODE_W) == KEY_REPEAT)
	{
		pos.y -= floor(speed*dt);
	}
	if (App->input->GetKey(SDL_SCANCODE_S) == KEY_DOWN || App->input->GetKey(SDL_SCANCODE_S) == KEY_REPEAT)
	{
		pos.y += floor(speed*dt);
	}
	if (App->input->GetKey(SDL_SCANCODE_A) == KEY_DOWN || App->input->GetKey(SDL_SCANCODE_A) == KEY_REPEAT)
	{
		pos.x -= floor(speed*dt);
	}
	if (App->input->GetKey(SDL_SCANCODE_D) == KEY_DOWN || App->input->GetKey(SDL_SCANCODE_D) == KEY_REPEAT)
	{
		pos.x += floor(speed*dt);
	}

	//TODO 4: don't forget to set the new FoWEntity position when needed!
	//Note that player HandleInput() function is called every frame, you do not need to update the FoWEntity position each frame, only when position changes

	if(auxPos!=pos)
	visionEntity->SetNewPosition(pos);

}
When you finish this series of TODO’s you should end up with a result like this:
The mask now moves with the entites but the entites are still not visible. You can also spawn more friendy entites whit left click.
TODO 5 - When to draw?
This TODO will make you complete a function that is vital to let entities know when are in visible areas and when they are not, and draw accordingly.
//TODO 5: Complete the following function: it shoud return the tile visibility (true if visible, otherwise false)
//This function will be used to check if we need to draw a certain entity
bool FoWManager::CheckTileVisibility(iPoint mapPos)const
{
	bool ret = false;
	//First check if the entity is inside the map
	//& get the tile fog information,its state, to check if is visible.
	//Note that the function that you need does both things for you, it is recommended to check and understand what the needed 		function does

	//Code here

		//Entity will only be visible in visible areas (no fog nor shroud)
		//Think about what happens with the smooth borders, are the considered visble or fogged?
		//Also, do you need to check both the fog and shroud states?
	//Code here

	return ret;
}
Solution:
//TODO 5: Complete the following function: it shoud return the tile visibility (true if visible, otherwise false)
//This function will be used to check if we need to draw a certain entity
bool FoWManager::CheckTileVisibility(iPoint mapPos)const
{
	bool ret = false;
	//First check if the entity is inside the map
	//& get the tile fog information,its state, to check if is visible.
	//Note that the function that you need does both things for you, it is recommended to check and understand what the needed 		function does

	FoWDataStruct* tileState = GetFoWTileState(mapPos);

	if (tileState != nullptr)
	{
		//Entity will only be visible in visible areas (no fog nor shroud)
		//Think about what happens with the smooth borders, are the considered visble or fogged?
		//Also, do you need to check both the fog and shroud states?
		if (tileState->tileFogBits != fow_ALL)
			ret = true;
	}

	return ret;
}
When you finish this series of TODO’s you should end up with a result like this:
And with this, you are done!
Homework
Good job! If you have arrived here it means that you have finished all the TODO’s, well done. Now it is time for homework to see if you have understood the basics.
First check the Fow Manager module’s function DrawFoWMap() and make sure you understand how it draws the FoW tiles. Then try to create a precomputed shape mask by yourself: You will only need to go to the FoW Manager header file and search for a variable named “circle masks”; you can then create an array of defines just as the ones that are already set there for you.
Note that every time that you create a new mask you have to increment the number [4] next to the variable name. Feel free to experiment with new shapes!
Possible Improvements
The most important one is timing, think about when you need to update the FoW map, it doesn’t need to be every frame, neither every time a unit is moved (as it is set in my code). You can combine the unit move check with a timer to perform the check every now and then. Between 0.25 and 0.5 sec will be fine in most cases.
I now have a FoW entity for every entity of the project, which keeps the project at a steady 60+ fps even with 100+ units. Nevertheless, you should consider grouping your entites and let them have just one FoW Entity for each group in case you want to have a lot of units toghether in one place to avoid re-checking the same tiles over and over again.
A nice improvement would be to make the shape masks procedurally generated, at least the circle ones. An algorithm could be created to generate a mask given a radius and detecting which tiles would be corners joints and straight lines. You can use both the the Neighbourh aware Tile selection algorithm and this circle drawing algorithm or the Bresenham circle drawing algorithm instead.